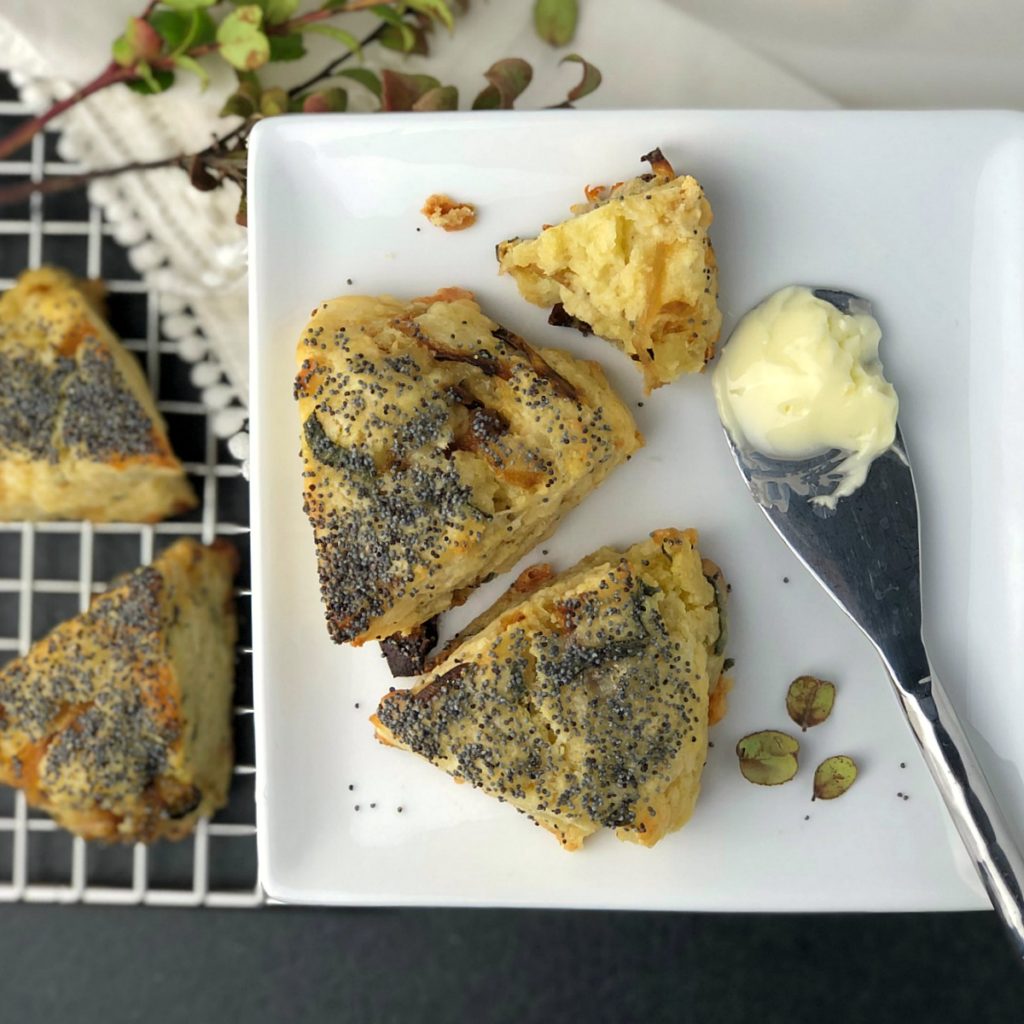
Caramelized Onion, Sage & Gruyere Mini Scones
Every time I make a batch of these scones, we eat most of them before they’re even off the pan. Their aroma from the oven is enticing and the warm pockets of Gruyere and caramelized onion is out-of-this-world. They’re a wonderful pre-cursor or accompaniment to brunch, lunch, or dinner.

- 1/3 c. well-shaken buttermilk
- 2 large eggs, divided
- 2 c. all-purpose flour (spooned into measuring cup)
- 2 tbsp. granulated sugar
- 2 tsp. baking powder
- 3/4 tsp. fine sea salt
- 6 tbsp. unsalted butter, cut into chunks (keep cold until use)
- 2/3 c. lightly caramelized onion, coarsely chopped (see TIP A below)
- 2 tbsp. chopped fresh sage
- 2-2.5 oz. Gruyere cheese, grated into medium shreds
- 1 tbsp. poppyseeds
-
In a small mixing bowl, beat together buttermilk and 1 egg and put the mixture in the fridge to stay cold while you measure your dry ingredients.
-
Put flour, granulated sugar, baking powder, and salt in a large food processor and gently pulse to combine and fluff. Then, pull the buttermilk-egg mixture and unsalted butter from the fridge. Cut the butter into cubes and add it to the food processor along with the buttermilk-egg mixture. Pulse the food processor just 10-15 times to combine the ingredients. Do not overmix. Dough should be crumbly with lentil-size pieces of butter running throughout. (See TIP B for alternatives to using a food processor.)
-
Transfer dough crumbles to a large mixing bowl and add the chopped caramelized onion, sage, and Gruyere shreds. Using your hands or a fork, distribute these ingredients throughout the dough. Work quickly so that the dough does not warm too much. Dough should remain crumbly with visible bits of butter.
-
Turn the dough onto a lightly floured surface, evenly divide it into two mounds, and pat each mound into a 3.5- to 4-inch diameter circle. Circles should be about 1 inch in thickness. Briefly whisk together the remaining egg to create an egg wash, and brush it over the top of each circle. Sprinkle 1 tbsp. of poppyseeds over each circle. Using a very sharp knife, cut each of the circles into 6 even triangles. Transfer the triangles to a dinner plate leaving a little space between each section and put the entire plate in the freezer for 30-60 minutes.
-
Line a baking sheet with parchment paper or a silicone baking pad. Set the scones evenly apart on the lined baking sheet and bake in a pre-heated 375° oven for 16-20 minutes or until lightly brown on the top. You don't want the scones to over-bake so begin to watch them closely as time approaches.
-
After the scones have set-up in the freezer for 30-60 minutes but before baking, transfer triangles to two large ziplock bags. Secure bags tightly and return them to the freezer for up to two weeks. Scones can be baked directly from frozen using the method above. They are best served warm, directly from the oven.
TIP A: For this recipe, you just need lightly caramelized onions because they will continue to soften and sweeten in the scones as they bake. I recommend caramelizing the onion in advance and putting it in the fridge to cool so that you do not warm any of the other scone ingredients (particularly the butter). The key to perfect caramelized onions is low and slow. Set your burner to medium-low and let 1 tablespoon of olive oil come up to temperature. Cut one medium onion into thin slices and add the onion to pan in a even layer. Then just let the heat and natural sugars of the onion do their thing for about 25-30 minutes. Stir occasionally to brown all sides of the onion slices.
TIP B: My mom swears by using a food processor for this recipe because it means that she can achieve the desired crumble of the dough quickly and without using her hands (which will naturally warm the ingredients). If you don't have a food processor, you can give the ole two-knife scissor technique a try or I recommend using a multi-blade pastry blender.