
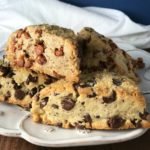
Scones for My Sons-In-Law
The key to this heart-warming recipe is cold, cold, cold. Cold cream, cold butter, cold mixing bowl, and even a cold blast in the freezer right before baking. Keeping the ingredients cold means that they blend and bake at different rates in the oven creating a light, layered, crumbly texture that is the signature of a really good scone. And the cream and sugar-dusted crust…need I say more?!? Serve them warm, directly from the oven and leave the butter and jam for your toast. You won’t need either—I guarantee it. From my mom to you and yours— “Aw, c’mon! Have another!”
- 1/2 c. plus 2 tbsp. heavy whipping cream, divided
- 1 large egg
- 1.5 tsp. pure vanilla extract
- 2 c. all-purpose flour (spoon flour into measuring cup, see TIP A below)
- 1/4 c. granulated sugar
- 2 tsp. baking powder
- 1/4 tsp. fine sea salt
- 6 tbsp. unsalted butter, cut into chunks (keep cold until use, see TIP B below)
- 1 tbsp. coarse white sugar or turbinado sugar
- 1.5 tsp. ground cinnamon
- 1/2 c. cinnamon chips Hershey's® makes a mini size that is perfect for this recipe!
- 3/4 to 1 c. semisweet chocolate chips (may also substitute bittersweet or milk chocolate)
-
In a small mixing bowl, beat together 1/2 c. cream, egg, and vanilla and put the mixture in the fridge to stay cold while you measure your dry ingredients.
-
Put flour, granulated sugar (not coarse sugar), baking powder, salt, and cinnamon (if using) in a large food processor and gently pulse to combine and fluff. Then, pull the wet ingredient mixture and unsalted butter from the fridge. Cut the butter into cubes and add it to the food processor along with the wet ingredient mixture. Pulse the food processor just 10-15 times to combine the ingredients. Do not overmix. Dough should be crumbly with lentil-size pieces of butter running throughout. Finally, add the cinnamon chips or chocolate chips and pulse another 5-6 times just to distribute. (See TIP B below for alternatives to using a food processor.)
-
Turn the dough onto a lightly floured surface and pat it into either one 6-inch diameter circle for large scones or two 3.5- to 4-inch diameter circles for mini scones. Circles should be about 1 inch in thickness. Brush remaining cream over the top of the circles and sprinkle with coarse sugar. Using a very sharp knife, cut the 6-inch circle into 8 even triangles or cut the two smaller circles into 6 even triangles each. Transfer triangles to a dinner plate leaving a little space between each section and put the entire plate in the freezer for 30-60 minutes.
-
Line a baking sheet with parchment paper or a silicone baking pad. Set the scones evenly apart on the lined baking sheet and bake in a pre-heated 375° oven for 20-24 minutes (larger scones) or 15-18 minutes (mini scones). In either case, look for scones to turn lightly brown on the top (especially around the edges) and for a faint hint of brown to appear along the bottom edge. You don't want the scones to over-bake so begin to watch them closely as time approaches.
-
After the scones have set-up in the freezer for 30-60 minutes but before baking, transfer triangles to two large ziplock bags. Secure bags tightly and return them to the freezer for up to one month. Scones can be baked directly from frozen using the method above. They are best served warm, directly from the oven.
TIP A: If you've spent any time consuming food media, then you're probably familiar with the statement, "Baking is a science and cooking is an art form." Personally, I think there is art and science to both, but it's true that precision—particularly around measuring and balancing ingredients—tends to be much more critical with baking than it is with cooking. When my mom shared this recipe, she made certain to remind me that the flour should be spooned from its storage container into a measuring cup (vs. scooped directly with the measuring cup) so that it does not get compacted. Unintended compacting can result it adding too much flour which will leave your scones—or any baked good— a bit dry. I guess the devil (or in this case, the delight!) is in the details.
TIP B: I mentioned the importance of keeping your ingredients cold at the outset of this recipe, but it is particularly important with the butter. You want the butter cold enough so that it can withstand all of the processing, mixing, and dough-shaping that happens. It should still show-up as little flecks in the finished product, right before freezing and baking. These flecks of solid butter melt in the oven creating tiny air pockets that result in the scones' signature light, layered texture. You don't want to miss out on this!
TIP C: My mom swears by using a food processor for this recipe because it means that she can achieve the desired crumble of the dough quickly and without using her hands (which will naturally warm the ingredients). If you don't have a food processor, you can give the ole two-knife scissor technique a try or I recommend using a multi-blade pastry blender.
Jessica · September 02, 2017
These are amazing!
off-script recipes · September 03, 2017
So glad you like them! We’re working on a pumpkin scone recipe for fall…stay tuned!